Linking to Notion with JavaScript: A Guide to Reading Shared Pages
Introduction
Notion is a powerful tool for collaboration, organization, and project management. With its easy-to-use interface and robust features, it has become a popular choice for many teams. If you’re looking to incorporate Notion into your project, one option is to connect to it using JavaScript. In this post, we’ll show you how to read shared pages in Notion using the JavaScript engine inside Sflow.io. But it should also work for client-side and server-side JavaScript running on Node.js. Sflow.io is a powerful project management and ticketing tool it has powerful features such as automation and JavaScript integration.
Steps
Step 1: Set up a Notion API Key The first step to connecting to Notion with JavaScript is to set up a Notion API Key. This key will allow you to access Notion data programmatically. To set up a key, you’ll need to sign up for the Notion API. Once you’ve created an account, you’ll be able to generate a key that you can use in your JavaScript code. Following is the document to generate the key.
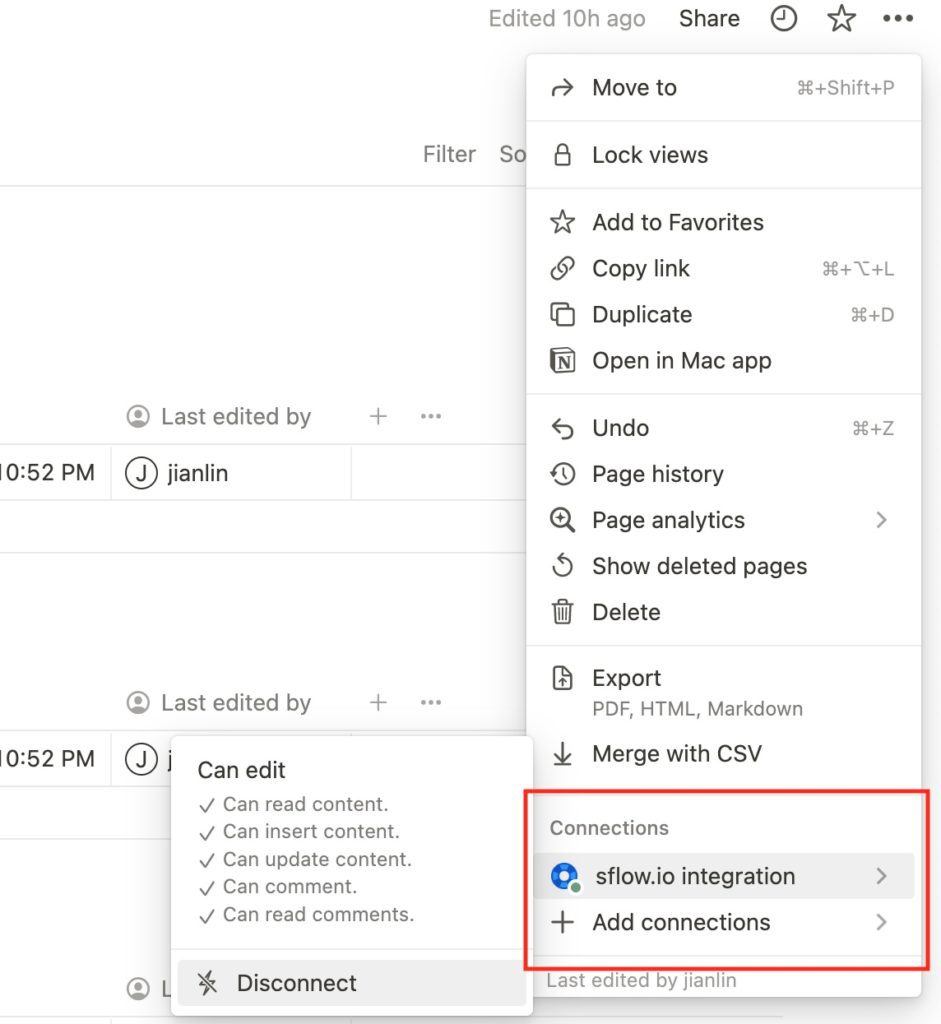
Step 2: Get the URL of the Shared Page The next step is to find the URL of the shared page that you want to read. To do this, go to the Notion page and click on the “Share” button in the top right corner. From there, you’ll be able to find the URL of the shared page. For the newer version of Notion, please go to the right-hand corner click on “…” button and click add Connection to add the integration to the page.
Step 3: Make a GET Request Now that you have the URL of the shared page and your API Key, you can use JavaScript to make a GET request to the Notion API. This request will retrieve the data from the shared page.
Here is an example of what this code might look like using Sflow.io JavaScript engine:
// Replace the placeholder API key with your own API key obtained from Notion
const API_KEY = "secret_Tz93P7SHLLB7pXgCHLhZs0KuN3wnE3YFcwaxxxxxxxx";

// Define the endpoint for Notion API
const API_URL = "https://api.notion.com/v1";

// Function to fetch list of pages and their contents
async function fetchPages(databaseId) {
  try {
    const timeout = 50000;
    const data = "";
    const messageurl = "https://api.notion.com/v1/databases/" + databaseId ;
    system.printf("fetchPages start", messageurl);
    // Make a GET request to the Notion API to get a list of pages
    //const headers = { 'Content-Type': 'application/json' };

    const headers = {
      "content-type": "application/json",
      "Authorization": "Bearer secret_Tz93P7SHLLB7pXgCHLhZs0KuN3wnE3YFcwa1mlxxxxxx",
      "Notion-Version": "2022-06-28"
    };
    system.printf("fetchPages API key", headers);

    const response  = await http.send("GET", messageurl, {
      timeout, headers
    });

    system.printf("fetchPages finished : ", response);
    task.create ()

    if (response == null) {
        throw new Error(`HTTP error! empty response:`);
    }

    if (!response || !response.ok) {
        throw new Error(`HTTP error! status: ${response.status}`);
    }
    system.printf("fetchPages wait for response.");

    console.log(response.json());

    // Extract the list of pages from the response
    const pages = response.data.results;

    // Loop through the list of pages and log each page content
    for (const page of pages) {
      console.log("Page content:", page.properties);
    }
  } catch (error) {
    console.error("Error fetching pages:", error);
  }
}

// Call the function and pass the database ID as argument

const main = async () => {
  system.printf("main enter");
  switch (self.action) {
    case IssueAction.create:
    system.printf("createIssue start");
      await createIssue(self.issue);
      break;
    case IssueAction.update:
      system.printf("callWebhook start");
      await updateIssue(self.issue);
      break;
    case IssueAction.softDelete:
      await deleteIssue();
      break;
    case IssueAction.hardDelete:
      break;
    case IssueAction.test:
       system.printf("test enter");
       await fetchPages("a663e398005245b79cab2a01cceccccc");
      break;
    case IssueAction.call:
      system.printf("createIssue start");
      await createIssue(self.issue);
      break;
    case IssueAction.column:
      break;
  }

};

return await main();
Step 4: Display the Data Once you’ve retrieved the data from the Notion API, you can use JavaScript to display it on your website or application. You can choose to display the data in a variety of formats, such as a table, a list, or even a visual graph.
Conclusion
Connecting to Notion with JavaScript is a great way to bring the power of Notion into your project. By reading shared pages, you can easily access Notion data programmatically, making it easier to manage projects, track progress, and collaborate with your team. With the steps outlined in this post, you should be able to quickly get started with linking to Notion with JavaScript and applications such as Sflow.io. Please signup for Sflow.io and try it for free. Experience the power of low-code and no-code development for project management and ticketing tool.