Creating a Professional Documentation Website in Minutes
Creating a powerful documentation website can be a daunting task, but with Sflow.io, it can be done in minutes. Sflow.io is a document management platform that allows users to create, organize, and publish their documentation in a seamless and intuitive way. In this article, we will walk you through the seven easy steps to create a powerful documentation website in minutes with Sflow.io.
Easy documentation and blog website creation steps:
Step 1: Register for a free trial with Sflow.io
The first step to creating a powerful documentation website is to register for a free trial with Sflow.io. This will give you access to all the features and tools that Sflow.io has to offer. Simply go to Sflow.io and sign up for a free trial.
Step 2: Create a documentation project
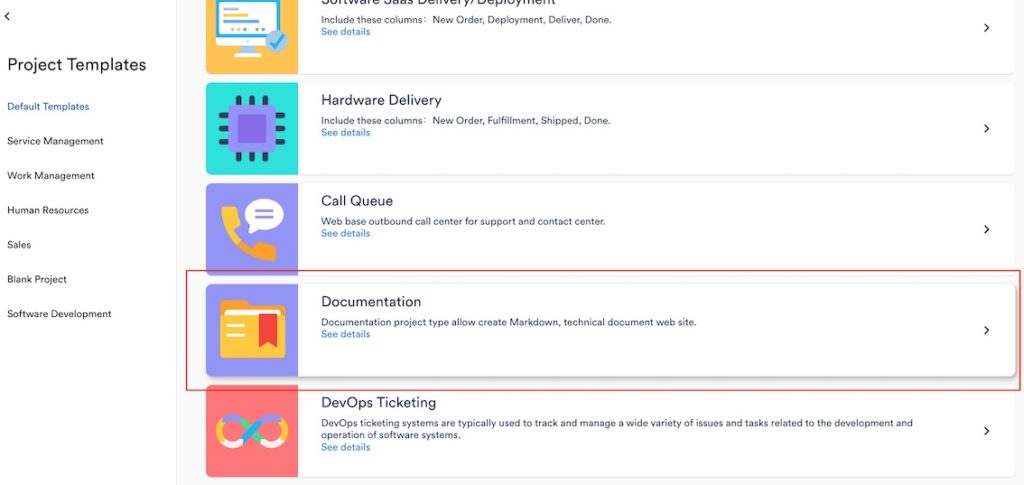
Once you are logged in to Sflow.io, you can create a new documentation project. This is where you will organize and publish your documentation website. Simply click on the “Create Project” button and give your project a name, and select the Documentation project type for the project template.

Step 3: Create folders, subfolders, and articles
The next step is to create folders, subfolders, and articles for your documentation website. Sflow.io makes it easy to organize your documentation by allowing you to create folders and subfolders. Simply click on the “Create” button, select the folder as task type and give your folder a name. Within each folder, you can create articles by clicking on the “Create” button, and selecting Article as for the task type. Use the markdown editor or preview editor to edit your content or paste the content into the editor. Guides exist for creating effective technical documents, such as the one from Berkeley on “How to Write Good Documentation“.
Step 4: Arrange the articles in the right order
Once you have created your folders, subfolders, and articles, you can arrange them in the right order. Simply drag and drop the articles to rearrange them. This will make it easy for your readers to navigate through your documentation website.
Step 5: Move the items ready to be published to the “Approved for publish” column
Once you have arranged your articles in the right order, you can move the items that are ready to be published to the “Approved for publish” column. This will make it easy for you to keep track of which items are ready to be published and keep the articles being edited from being published prematurely.
Step 6: Click on “Generate doc site” to generate the blog site
When you are ready to publish your documentation website, simply click on the “Generate doc site” button. This will generate your documentation website, which you can then view and share with your readers.
Step 7: View and link the documentation website to your own website
The final step is to view your documentation website by clicking on the “Doc site ” button. If you are happy with the result, you can then link it to your own website using the direct link to this doc site or embed it with iframe. This will make it easy for your readers to access your documentation from your own website.
Conclusion:
In conclusion, creating a powerful documentation website with Sflow.io is a simple and easy process. With its intuitive interface and powerful features, you can create, organize, and publish your documentation in minutes. So, why wait? Sign up for a free trial with Sflow.io today and start creating your powerful documentation website.